|
View unanswered posts | View active topics
| Author |
Message |
|
graeme
|
Post subject: Re: Aussie TT2 track bike build  Posted: Posted: Thu Aug 16, 2012 6:26 pm |
|
Joined: Sun Nov 07, 2010 10:54 pm
Posts: 541
Location: Brisbane
|
|
Steve, I found that I had to lift the rear of the bottom fairing as high as it would go, and back as far as possible to allow the bars and mastercylinders to clear the top fairing arms. (just)
The holes that are in the bottom fairing don't quite line up with the oil and filter, but that's not so hard to glass up and re cut.
Don't forget that the mold for these fairings is now old and has popped out heaps of fairings. And it was (I'm told) taken from a very well used TT2.
If you look at Carlos TT2 you can see from the side view that the distance from the top arms to the lower (the gap where the bars go) is very much wider than your gap.
This can be addressed when you fit the top arm stays.
And by lifting the arms up the fairing will narrow slightly.
Did you get a seat from the same supplier? Is is square?
Mine was crap and I used it as a plug to make a mold. (looked like a cow had stepped in the mold before it was made)
How long is your front fairing bracket? it looks very long?
graeme
|
|
| Top |
|
 |
|
Pantah600
|
Post subject: Re: Aussie TT2 track bike build Posted: Fri Aug 17, 2012 3:32 am |
|
Joined: Sun Jan 09, 2011 1:26 am
Posts: 175
Images: 6
Location: Melbourne, Australia
|
|
Thanks Graeme,
yes, you are correct the front bracket IS too long. So, I need to drill some new holes allowing the fairing to move rearwards.
If I make some angled changes to the brackets, I can also raise it too. I must also check that the new oil cooler fits between the bracket & the fairing running over the front wheel.
The only other question I have Graeme is, the fairing has a cross brace "wing", does this butt up against the frame cross tube? Again, I'll post a photo for a better explanation shortly.
The seat base is square. No photo shows it, but it is. The only thing is, it's a little tight around the "palle" if you know what I mean?
Cheers for your wisdom & sage advice.
Steve
_________________
"...Honey, it's only a project bike...."
|
|
| Top |
|
|
|
graeme
|
Post subject: Re: Aussie TT2 track bike build Posted: Fri Aug 17, 2012 4:31 am |
|
Joined: Sun Nov 07, 2010 10:54 pm
Posts: 541
Location: Brisbane
|
|
No wisdom or sageness involved, just what worked for me.
You will get wisdom and sage advice from many others here.
The cross piece of the bottom fairing (the piece that joins both sides at the front upper)?
The rear edge of this piece is 20mm lower and 10mm forward of the lower cross piece of the frame.
But this fairing piece I cut and widened to fit a wider 748 front end, so my measurements may have no relavance to your TT2.
Good luck
|
|
| Top |
|
|
|
Pantah600
|
Post subject: Re: Aussie TT2 track bike build Posted: Sat Aug 18, 2012 4:21 am |
|
Joined: Sun Jan 09, 2011 1:26 am
Posts: 175
Images: 6
Location: Melbourne, Australia
|
Thanks Graeme, yes, that's the one. And I understand the front end differences. But, if you could have a look at what I'm up against, then your words would always help. I took some photos to explain the area. Below is the side view skewed frontways... Attachment:
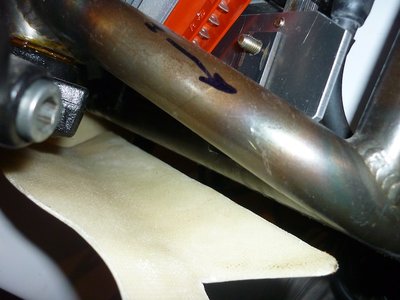 Fairing6.jpg [ 134.11 KiB | Viewed 2441 times ]
This photo is from the rear looking forward under the tank.... Attachment:
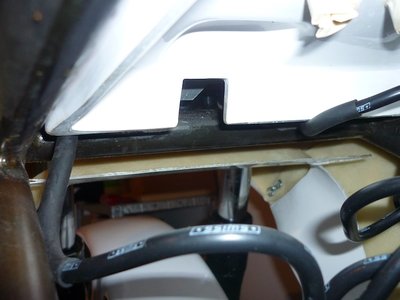 Fairing7.jpg [ 103.56 KiB | Viewed 2441 times ]
You can see at this stage how low it is sitting... However, today we had lot's of heavy rain so I couldn't work outside....so I worked a little INSIDE! I shortened the front bracket and doing so has moved the whole fairing rearwards by as much as 10mm. Now, I need to re-strike the front and rear brackets to allow the fairing to move without resistance. Question? Do the sides sit vertically? As in looking from rear view of the bike, do the side walls of the fairing line up vertically? Or do they splay slightly? Cheers, Steve
_________________
"...Honey, it's only a project bike...."
|
|
| Top |
|
|
|
graeme
|
Post subject: Re: Aussie TT2 track bike build Posted: Sat Aug 18, 2012 5:10 am |
|
Joined: Sun Nov 07, 2010 10:54 pm
Posts: 541
Location: Brisbane
|
|
Steve, my Gowanloch fairing didn't have that wing like yours has.
My computer is still off so I took some phone pictures an emailed them to you.
The sides on my fairing curve up from underneath and look vertical where the brackets fix to the fairing.
If your brackets are all slightly different angles (to horizontal) and lengths, your fairing will stay in place and won't sag. (if all same angle/length it can sag)
I hope this makes sense?
Hopefully someone with a real TT2 will answer here, I don't want to lead you astray.
But if they are anything like the '82 to '84 road bikes, anything is possible.
Graeme
|
|
| Top |
|
|
|
Pantah600
|
Post subject: Re: Aussie TT2 track bike build Posted: Sat Aug 18, 2012 7:33 pm |
|
Joined: Sun Jan 09, 2011 1:26 am
Posts: 175
Images: 6
Location: Melbourne, Australia
|
|
Hi Graeme,
thanks for your emailed photos! Yes, strangely your fairing is different to mine. Too many resin fumes for these artists!
I'll play with it today and see what we come up with.
Thanks for showing me the sides being vertical. That is exactly what I'm after. Information like that.
Cheers,
Steve
_________________
"...Honey, it's only a project bike...."
|
|
| Top |
|
|
|
Pantah600
|
Post subject: Re: Aussie TT2 track bike build Posted: Thu Aug 30, 2012 6:29 am |
|
Joined: Sun Jan 09, 2011 1:26 am
Posts: 175
Images: 6
Location: Melbourne, Australia
|
 Folks, I would appreciate anyone's feedback regarding my proposed wiring diagram for the TT2. Considering the engine alternator & electrical parts are stock except for the Voltage Regulator which is a "bridge" type 2 wire version. I have this same version on the current Pantah which does away with the resistors. I have added a momentary push button & separate kill switch unit. Please review and confirm if my wiring diagram is ok. Thanks, Steve Proposed TT2 wiring diagram: Attachment:
 Wiring diagram.pdf [47.57 KiB]
Downloaded 264 times
Wiring diagram.pdf [47.57 KiB]
Downloaded 264 times
Original Pantah wiring diagram: Attachment:
Wiring.pdf [421.42 KiB]
Downloaded 233 times
_________________
"...Honey, it's only a project bike...."
|
|
| Top |
|
|
|
Wolf
|
Post subject: Re: Aussie TT2 track bike build Posted: Thu Sep 06, 2012 3:36 pm |
|
Joined: Wed Jul 04, 2012 6:50 pm
Posts: 101
|
|
Dear Steve,
this is really a very lean wiring loom! I like it!
I'm not sure if the connection between terminal "C" an the fuse box ist the best of all options. As far as I remember there should be the ignition key in between them. The way you connected them, you always have the "+" from the battery on "C". Not shure if this is meant that way...
everything else looks very good!
maybe someone else would like to comment?
Regards
Wolf
|
|
| Top |
|
|
|
Pantah600
|
Post subject: Re: Aussie TT2 track bike build Posted: Tue Sep 25, 2012 3:13 am |
|
Joined: Sun Jan 09, 2011 1:26 am
Posts: 175
Images: 6
Location: Melbourne, Australia
|
|
Thanks Wolf.
Sorry I have been away last month visiting a mate in Adelaide. Nice easy ride out that way. Lovely roads around the hills and the like.
Your comment about the wire leading out from the 'C' regulator connector is precisely what I need to confirm.
The reason it does this is because I will do away with the key switch and replace it with a push button starter as the race bikes have.
So, the BN (brown) wire from the 'C' connector at the regulator is spliced to part 15, then runs to terminal block 10 at the key switch, continues as the R (red) wire at connector 11 to the 25AMP fuse block. Even though the other BN (brown) wire coming from the 8AMP fuse is also spliced to the same 'C' connector at the regulator....
I need a drink.....
Anyway, I appreciate everybody's input and suggestions.
Keep them coming....
Cheers,
Steve
_________________
"...Honey, it's only a project bike...."
|
|
| Top |
|
|
|
Pantah600
|
Post subject: Re: Aussie TT2 track bike build Posted: Wed Oct 10, 2012 6:35 am |
|
Joined: Sun Jan 09, 2011 1:26 am
Posts: 175
Images: 6
Location: Melbourne, Australia
|
 Well folks, been very busy waiting on things to be started & finished... but, I have been busy. I used an old Giannelli pipe I had set aside for this project. I could have purchased Steve's magnificent works of art, however, I have to do this on a budget. So, it's recycle item time. I attempted to weld it myself but thought the better of it. I'm amazed I shaped it well enough to fit. I cut down the internal spring loaded baffle and sliced off the end cone to resemble a replica pipe. In order to fit the baffle, I had the end cone seam welded to fit the offcut in reverse to clamp the baffle under spring preload. Now, I need to 'ding' it to clear the shifter pedal. Pipe1 Attachment:
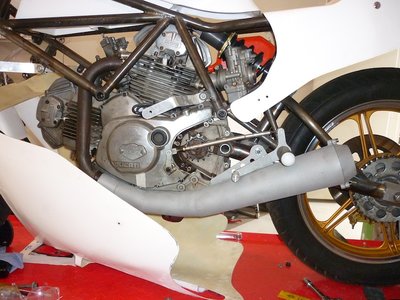 Exhaust3.jpg [ 183.61 KiB | Viewed 2189 times ]
Pipe2 Attachment:
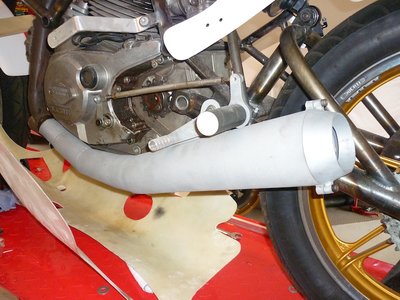 Exhaust2.jpg [ 182.84 KiB | Viewed 2189 times ]
Then came the exciting part of drilling the oil cooler holes in the glass without smashing the glass. I used a profile cut template and did my best. It's a little off center but, that's another story.... Oil holes Attachment:
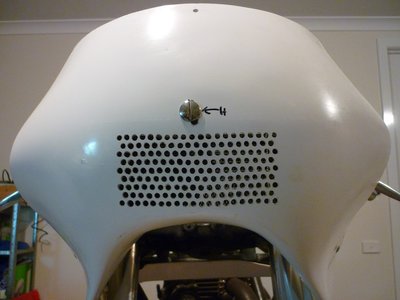 Oil cooler5.jpg [ 120.23 KiB | Viewed 2189 times ]
Very soon, it'll be time to paint. So, get ready everybody, I'll be asking heaps of questions..... Cheers, Steve
_________________
"...Honey, it's only a project bike...."
|
|
| Top |
|
|
Who is online |
Users browsing this forum: No registered users and 65 guests |
|
You cannot post new topics in this forum
You cannot reply to topics in this forum
You cannot edit your posts in this forum
You cannot delete your posts in this forum
You cannot post attachments in this forum
|
|
|


