Ducati TT1, Ducati TT2 and Ducati 750 F1 Forum http://www.ducatittandf1.com/ |
|
Motor build for "Yellow Bike III" http://www.ducatittandf1.com/viewtopic.php?f=24&t=10299 |
Page 1 of 6 |
Author: | pantah_good [ Sat Feb 23, 2013 9:55 pm ] |
Post subject: | Re: Motor build for "Yellow Bike III" |
This looks like a good thread. My first thought - shit can the charging system. Bill |
Author: | archimedes [ Mon Feb 25, 2013 9:16 am ] |
Post subject: | Re: Motor build for "Yellow Bike III" |
subscribed. |
Author: | Geoff [ Mon Feb 25, 2013 3:39 pm ] |
Post subject: | Re: Motor build for "Yellow Bike III" |
That's a lot of valve in those bathtub chambers. Why not dual spark on this one? |
Author: | Palmer [ Tue Feb 26, 2013 9:14 am ] |
Post subject: | Re: Motor build for "Yellow Bike III" |
Bill, From what I understand the bike will be a track bike with maybe some racing so I think they're keeping the charging system and starter for easy operations. The motor won't be built too radical. Something to run real good for a long time, hopefully. Geoff, My experience with the dual plug heads hasn't shown any difference in horsepower or performance. For the original "Yellow Bike" we had both single plug heads and daul plug heads. Bruce Meyers told me that I wouldn't see any power difference but would probably feel it accelerate smoother, but I couldn't tell the difference. It may make a bigger difference with a larger bore. For a 90mm bore, I don't see the value. Palmer |
Author: | pantah_good [ Tue Feb 26, 2013 10:03 am ] |
Post subject: | Re: Motor build for "Yellow Bike III" |
Hi Gary, My second thought should have been to work on the phraseology of my last post a little more. That was a little blunt, sorry. If the bike is not going after any championships, a more civilized approach is good. Although, unless it's going to run in an endurance race at some point, I doubt if they would miss the charging system, and may appreciate the pluses. Bill |
Author: | 618F1 [ Tue Feb 26, 2013 11:30 am ] |
Post subject: | Re: Motor build for "Yellow Bike III" |
Thanks for posting this Gary. It will be great to follow; maybe we can spot some speed secrets now and then. In regard to dual plugs, they do seem to help at the bottom when HC pistons are used in hemi-like chambers, and the stock plug is on one side --- like Guzzis and a Ducatis. It is a long way for the flame to travel over the top of some pistons, and having spark from both sides does seem to smooth and improve the low-RPM range. It may improve mileage. First time I used it on my old 78 LeMans I almost pulled a wheely! I think it depends on the nature of some engines. MikeV PS: Those are beautiful pistons for the older circular chamber. But what did you mean by "blanks"? |
Author: | Palmer [ Wed Feb 27, 2013 9:39 am ] | |||||||
Post subject: | Re: Motor build for "Yellow Bike III" | |||||||
Mike, My reference to piston blanks is that the pistons I got from Bruce are unfinished and can be machined and profiled to get the CR and squish area that I want for this motor. Today I'll show what I'm doing for the 5-speed, dry clutch conversion. I'm sure there are many ways to do this conversion but this is my method. Ducati came out with the 6-speed for the small case motors and was actually selling it as a performance transmission but due to the ratios I found it to be slower around the race track then the 5-speed. With the 6-speed your top three gears are closer together but the lower three are about the same spacing as the 5-speed. At my Blackhawk Farms the 6-speed cost me 2 seconds a lap because of the number of shifts. So for this motor we'll convert to 5-speed. Tghe 800 motor is a much improved design over the earier small case motor and many things are different. The oiling system is very different. Changing the transmission is just a bolt in swap for a 1999 750 5-speed but converting it to dry clutch does require modifications. The big issue is oil flow and return. On the late model 750s and 800s the oil returns thru the transmission input shaft to the clutch basket so converting to a dry clutch the oil has to be redirected. I start by EDMing two .040" holes in the input shaft at the roller bearing and filling the hole and part of the splines on the clutch basket end. Next the input shaft is modified to add a roller bearing for the clutch push rod, a special nut is made to retain the clutch hub because of how short the input shaft is. This nut holds a retainer for the clutch push rod seal. Then the LH engine case is drilled next to were the clutch push ron goes in with two .090" holes to bleed of oil and return it to the sump. Also with the 800 cases, if you are using the carb type ignition you may have to drill and tap the bosses for the banana clip attachment and you have to machine down the from engine mounts and bush them for 10mm mounting to the F1 frame. The late model small case engines also us an oil pump with a intagrated presure releif valve so thew RH dry clutch cover has to be clearenced for the pump. Also I have found the need to drill a .040" oiling hole in the cover to oil the primary gears. More to follow. Palmer
|
Author: | 618F1 [ Thu Feb 28, 2013 12:54 am ] |
Post subject: | Re: Motor build for "Yellow Bike III" |
Frightens me to think of the damage I could have done to some 750/800 cases without this info Gary. I plan to eventually put a 5-speed 750 Sport gear set in one. Had also stared at that new shorter wet clutch input shaft and wondered about filling the hole and those long splines so it would not leak, but thought it not possible. JB Weld? MikeV |
Author: | loudbike [ Wed Apr 10, 2013 5:57 pm ] | ||||||||
Post subject: | Re: Motor build for "Yellow Bike III" | ||||||||
Mike - to answer your question; yup - JB Weld, then chuck it up on your lathe to finish. 
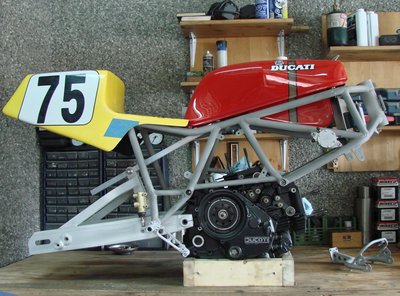
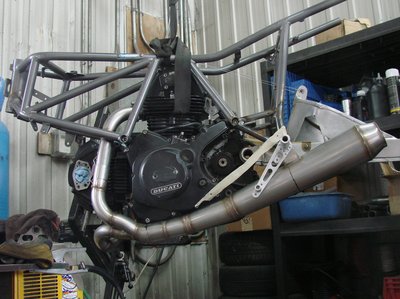
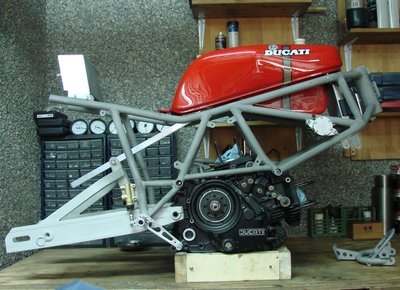
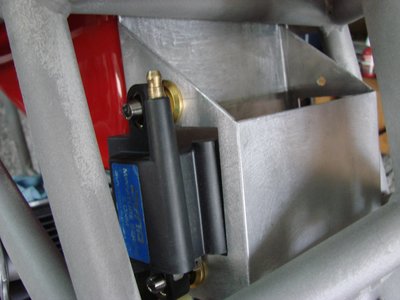
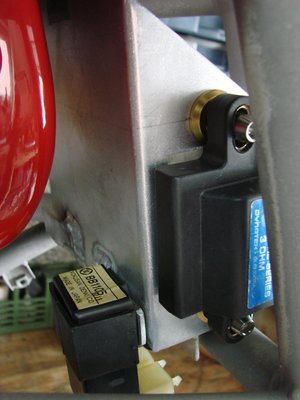
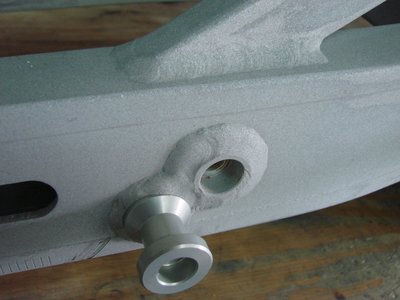
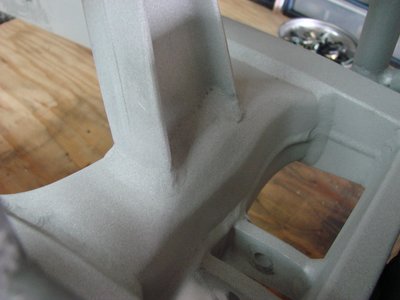
Rather than start a new thread for the chassis build, I'll just jump into this one (same bike after all).. With all the welding completed, I picked up the frame from the blaster today and was able to fit the stuff together and snap a few pics (attached). The box on the rear sub-frame is a crankcase breather catch box that doubles as a seat support and will be polished. The battery box will be polished as well and will have the regulator mounted on the front. The way I’ve set this up, you’ll be able to removed the tank and unscrew two fasteners, disconnect two plugs and remove the entire electrical system in one shot. The swing arm is a marriage of a 900SS and a 851; essentially, cut the two swing arms up, weld the bits together and make a new, longer swing arm that even Gary can't break.. It’ll be painted the same color as the frame. About 18 months ago, Gary took a couple of degrees out of the steering head, removed the entire rear sub-frame removed and welded new foot peg hangers in place. From that starting point, I had braces added between the front and rear motor mounts and eleven new mounting tabs added (locally) after I removed all the tabs and bits we didn't need. From this point forward, everything gets pretty easy (and a lot more fun): • Specify and order the new shock • Do a little body work on the tail section/seat • Fabricate an aluminum plate for under the seat/tail aluminum lower seat mount brackets upper fairing mount lower fairing mounts wheel spacers oil cooler mounts dash plate • Machine rear caliper hanger bush rear caliper torque arm front brake caliper adapters swing arm spool inner washers clip-ons (bore them out to 43mm) triple clamps (bore them out to 43mm) • Set-up the forks and prep the lowers for paint • Make the wiring harness Then bolt the whole mess together, bounce up & down on it and go "Vrooom, Vrooom!" Pretty good chance the whole kit will be rolling by the end of the month. With the exception of the fork lowers, I probably won’t have the painting and buffing done until after we install and dyno the motor - which will likely happen in Gary's neck of the woods 'cause any excuse for a visit is a good one..
|
Page 1 of 6 | All times are UTC - 5 hours [ DST ] |
Powered by phpBB © 2000, 2002, 2005, 2007 phpBB Group http://www.phpbb.com/ |