|
View unanswered posts | View active topics
| Author |
Message |
|
sports
|
Post subject: Re: Aussie TT2 track bike build  Posted: Posted: Tue Mar 26, 2013 4:44 am |
|
Joined: Wed Mar 21, 2012 9:56 am
Posts: 112
|
|
| Top |
|
 |
|
brad black
|
Post subject: Re: Aussie TT2 track bike build Posted: Wed Mar 27, 2013 4:10 am |
|
Joined: Mon Jan 21, 2013 4:36 pm
Posts: 205
|
wdietz186 wrote: My rods have a groove machined into the rod covering approx. 30deg. on each side of the center hole and the bearing gets the small hole 20 or so deg. advanced of TDC. Same as idea as Sports,different execution. photo?
|
|
| Top |
|
|
|
wdietz186
|
Post subject: Re: Aussie TT2 track bike build Posted: Wed Mar 27, 2013 8:41 pm |
|
Joined: Thu Oct 14, 2010 7:30 am
Posts: 174
|
|
Sorry Brad,They are deep inside my 900 With no plans to disassemble anytime soon. If I remember correctly the groove is about 1.5-2.00mm wide and 25ish mm long.Mr. Carrillo said it was EDM machined which I take as a better way to remove metal without inducing stress risers in the metal as cutting tools might do. I think he said it took a couple of hours to spark away the hole through the length of the rod. It is said Carrillo rods are forever and in my experience they really are. The ones in my F1 are from around 1987 and have survived more than a few piston failures and one small end was tweaked slightly for quite a while.I sent them to Carrillo for refurbishment and for about $250 they straightened,magnafluxed,shotpeened, rebored the big end, and bushed the pin,good for another 20yrs. Wonderfully quick service too!
|
|
| Top |
|
|
|
Pantah600
|
Post subject: Re: Aussie TT2 track bike build Posted: Tue May 07, 2013 8:04 am |
|
Joined: Sun Jan 09, 2011 1:26 am
Posts: 175
Images: 6
Location: Melbourne, Australia
|
 Sorry folks, I got a little lost for a while there... But, I'm happy to report that I have been slowly assembling the engine together whilst still waiting for some parts coming from overseas. Photo's shortly... Suffice to say, the engine cases have been cleaned, new helicoils reinstated, all bearings and seals replaced, the crankshaft and conrods with new shells installed... So, I just have to pull my finger out and clean the gearbox shafts and install them all in to the cases and then check end float. Just for reference, zero end float for the crank, 0.2mm for all the other shafts as per the workshop manuals. Yes, there are 2 of them with sometimes differing info. Then, when all is ok and shimmed, I can replace the setup gasket with a spare new one I have. Unfortunately, I'm having trouble sourcing piston ring kits, but have been scouring the web looking around. Just out of curiosity, do I need to restrict the oil passages to the heads if I'm installing an oil cooler with dash 3 oil lines into the cam bearing covers? I figure with these small oil lines, there won't be too much oil flow resistance coming up from the oil pump throughout the engine and up through the oil galleries to the heads.... Photos coming soon. Cheers, Steve
_________________
"...Honey, it's only a project bike...."
|
|
| Top |
|
|
|
TT1-F1
|
Post subject: Re: Aussie TT2 track bike build Posted: Tue May 07, 2013 3:51 pm |
|
Joined: Sun Oct 17, 2010 3:26 am
Posts: 82
Images: 3
|
|
I have a 1mm restriction for the cams and the newer type main bearings (if you used them) have a preload in the newer type bottom....
Jarno
|
|
| Top |
|
|
|
wdietz186
|
Post subject: Re: Aussie TT2 track bike build Posted: Tue May 07, 2013 10:29 pm |
|
Joined: Thu Oct 14, 2010 7:30 am
Posts: 174
|
|
Steve, The commonly accepted preload on the crank is about .1mm [.004"] The crank will have some drag when turned but will fall of it's own accord when the heavy part of the flywheel is 90 deg. from BDC. If you are going to the trouble of checking and shimming all the shafts,why bother with a gasket? Sealer works just fine.
If you are feeding the oil to the heads through the cam blocks you don't need the passages in the cyl/head at all. The ones in my F1 are plugged with set screws in the block and the heads. It also eliminates a possible oil leak source and the head/cyl. junction.
|
|
| Top |
|
|
|
Pantah600
|
Post subject: Re: Aussie TT2 track bike build Posted: Wed Jun 26, 2013 5:18 am |
|
Joined: Sun Jan 09, 2011 1:26 am
Posts: 175
Images: 6
Location: Melbourne, Australia
|
Ok Gents, been very busy these last couple of months. Thanks to everybody's suggestions and advice. Taken onboard and locked in. Slowly I have been assembling parts that I'd put off for far too long. Always waiting for minor parts that never seemed to arrive. Anyway, the first components to assemble are the forks. Again, I would have loved to purchase some of Gil's magnesium replica's but they'll have to wait. I checked the front spring lengths and decided to use them again. I'll eventually chase down some stiffer springs since I'm no longer petite... Standard 35mm Marzocchi forks... Attachment:
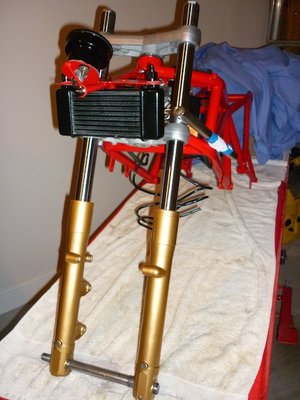 Forks1.jpg [ 103.68 KiB | Viewed 2045 times ]
Then the calipers I doctored earlier... Attachment:
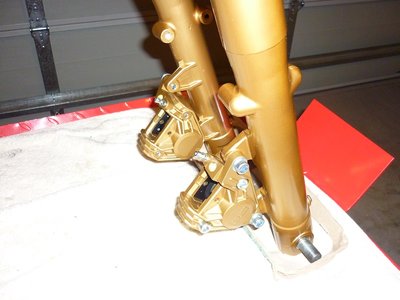 Forks2.jpg [ 121.17 KiB | Viewed 2045 times ]
Then I got some other parts that the painter decided to finish.... Attachment:
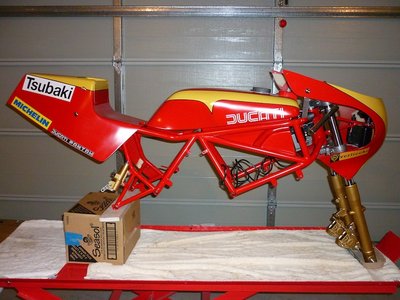 Assembly9.jpg [ 182.88 KiB | Viewed 2045 times ]
And.... Attachment:
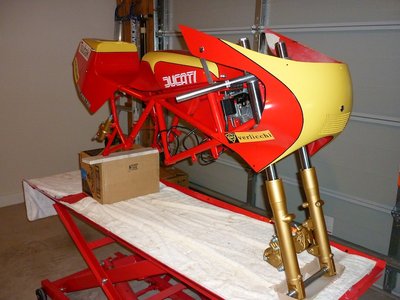 Assembly10.jpg [ 166.82 KiB | Viewed 2045 times ]
So, next up is the engine assembly! FINALLY! That was the single biggest hurdle I've endured. Don't ask why. In my earlier posts, I'm still doing the garden/landscaping and now that it's winter here...it's bike time! That's next. Cheers, Steve
_________________
"...Honey, it's only a project bike...."
|
|
| Top |
|
|
|
graeme
|
Post subject: Re: Aussie TT2 track bike build Posted: Wed Jun 26, 2013 7:14 am |
|
Joined: Sun Nov 07, 2010 10:54 pm
Posts: 541
Location: Brisbane
|
|
" I'll eventually chase down some stiffer springs since I'm no longer petite..."
Maybe not so light anymore, but your bike is !
Very nice.
|
|
| Top |
|
|
|
Carlo
|
Post subject: Re: Aussie TT2 track bike build Posted: Wed Jun 26, 2013 6:10 pm |
|
Joined: Thu Oct 28, 2010 4:44 am
Posts: 1827
Images: 7
|
You've done an excellent job! Keep it up!  Carlo.
|
|
| Top |
|
|
|
Pantah600
|
Post subject: Re: Aussie TT2 track bike build Posted: Wed Jul 10, 2013 6:40 am |
|
Joined: Sun Jan 09, 2011 1:26 am
Posts: 175
Images: 6
Location: Melbourne, Australia
|
Thanks Graeme & Carlo! Every bit of encouragement goes a long way! Now, I have a query regarding the pressure plate. I researched my disassembly photos of where the pressure plate is positioned to no avail. Does it bottom out on the bosses of the hub or is there some clearance to the hub? The workshop manual is most unhelpful. Please review the photo attached... Attachment:
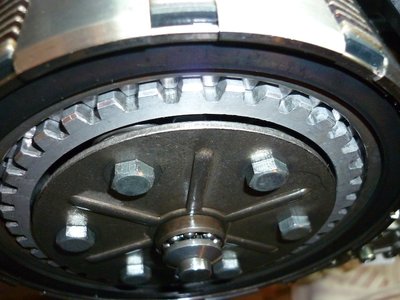 Clutch plate.jpg [ 154.06 KiB | Viewed 1918 times ]
This is where one of the photos showed me the pressure plate. But, I can't recall if I'd already started to loosen the bolts....  Appreciate your guidance. Cheers, Steve
_________________
"...Honey, it's only a project bike...."
|
|
| Top |
|
|
Who is online |
Users browsing this forum: No registered users and 20 guests |
|
You cannot post new topics in this forum
You cannot reply to topics in this forum
You cannot edit your posts in this forum
You cannot delete your posts in this forum
You cannot post attachments in this forum
|
|
|


