|
View unanswered posts | View active topics
 
|
Page 1 of 1
|
[ 10 posts ] |
|
| Author |
Message |
|
618F1
|
Post subject: Misc head repairs etc  Posted: Posted: Sun Nov 24, 2024 3:11 pm |
|
Joined: Thu Oct 14, 2010 11:23 am
Posts: 1927
|
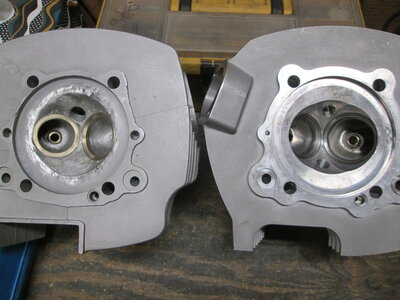
This is what I have been doing to entertain myself during our recent rains: Repairing heads damaged by myself and others; making lemonade out of lemons. Giving them some added usefulness. First is a Vertical head (of course) damaged by me, because I goofed up a belt or cam cog placement, and then what it looked like before (by Carlo). They were great when first installed on my TT2 - went to 10,000 RPM quickly with 900SS H cams installed, and made the clutch slip in 3rd and 4th gears. My error required me to tig weld the damage, which looked like someone had taken a claw hammer to the chamber. And insert new seats and exhaust guides. Valves will be 40 and 35mm again. While at that I have ported the set in the vein of what Ducati now does, and what others have done successfully. The V head is really a copy of what someone else had already done to the H head (see the intake porting), bought separately. The very nice new V head is the version made by Jan de Vos (RED FOX), based on 1995 750 Ducati specs. Look how deep the ports are above the valve heads! They come without guides or seats, so I installed those as well. Then, while doing a more simple repair to a different set sold to me years ago, just a crack between a seat and plug threads, I discovered that something similar had happened to the H head. Never saw it till I scraped some carbon off. Surprise. This set will be kept simple with a 39mm intake and some minimal porting. Likely street use. These are all still work in progress, so don't be too hard on me. Yes, some of you really observant ones (flattop, Cranky, Carlo) will note the staking of the seats in the first set. The exhaust seats just went in a bit easier than I expected. All of this is experimental to me, and that is just an insurance policy because of the many mods I had to make. Amateurs. Now if I could only learn to balance a set of crank, rods, and pistons. Like Carlo. Oh, and after these are completed they are off to Lou to have the chambers polished to a chrome-like finish. MikeV Attachment:
 IMG_2546.JPG [ 4.53 MiB | Viewed 19230 times ]
Attachment:
 IMG_2550.JPG [ 4.22 MiB | Viewed 19230 times ]
Attachment:
 IMG_2547.JPG [ 3.68 MiB | Viewed 19230 times ]
Attachment:
 IMG_2548.JPG [ 4.02 MiB | Viewed 19230 times ]
Attachment:
 IMG_2549.JPG [ 3.03 MiB | Viewed 19230 times ]
Attachment:
 IMG_2551.JPG [ 3.99 MiB | Viewed 19230 times ]
Attachment:
 IMG_2553.JPG [ 4.13 MiB | Viewed 19230 times ]
Attachment:
 IMG_2555.JPG [ 3.99 MiB | Viewed 19230 times ]
Last edited by 618F1 on Sun Dec 01, 2024 2:52 pm, edited 3 times in total.
|
|
| Top |
|
 |
|
flattop900
|
Post subject: Re: Misc head repairs etc Posted: Wed Nov 27, 2024 11:06 am |
|
Joined: Tue Mar 18, 2014 10:03 am
Posts: 399
|
|
Hi Mike... so what happened to the Carlo head? Drop a valve? Just like Lou's bell mouth, I don't think I'd have the courage to tackle a project like this.
|
|
| Top |
|
|
|
Carlo
|
Post subject: Re: Misc head repairs etc Posted: Wed Nov 27, 2024 11:26 am |
|
Joined: Thu Oct 28, 2010 4:44 am
Posts: 1873
Images: 7
|
Hello friends, unfortunately I can't understand the meaning of the question with the simultaneous translator, I don't want to make you go into exhausting explanations, maybe tell me if I did something wrong 
|
|
| Top |
|
|
|
618F1
|
Post subject: Re: Misc head repairs etc Posted: Sat Nov 30, 2024 12:43 pm |
|
Joined: Thu Oct 14, 2010 11:23 am
Posts: 1927
|
|
Ciao Carlo. Sorry I took so long to post a reply.
Everything you did was GOOD. It was PERFECT. And I was happy.
I put the heads together and the engine ran very good. 10,000 RPM. But then I messed up the belt or the cam wheel. And I blew up the vertical head! And the piston, and the cylinder. So now I am repairing the set. The second set you worked on will go on a street bike.
I hope you understand.
Just a fan,
MikeV
|
|
| Top |
|
|
|
CrankyRoller
|
Post subject: Re: Misc head repairs etc Posted: Sat Nov 30, 2024 9:30 pm |
|
Joined: Tue Oct 05, 2010 9:21 am
Posts: 302
Images: 0
|
Hay Mike Nice to see your getting ahead....ok bad pun  . What press fit are you using on those seats and how are you installing them? If you can do this kind of work you can definitely balance a crank assembly. -CRanky-
|
|
| Top |
|
|
|
Carlo
|
Post subject: Re: Misc head repairs etc Posted: Sun Dec 01, 2024 12:03 pm |
|
Joined: Thu Oct 28, 2010 4:44 am
Posts: 1873
Images: 7
|
618F1 wrote: Ciao Carlo. Sorry I took so long to post a reply.
Everything you did was GOOD. It was PERFECT. And I was happy.
I put the heads together and the engine ran very good. 10,000 RPM. But then I messed up the belt or the cam wheel. And I blew up the vertical head! And the piston, and the cylinder. So now I am repairing the set. The second set you worked on will go on a street bike.
I hope you understand.
Just a fan,
MikeV Hi Mike, thank you for writing perfect English, my translator translated perfectly. I am glad that everything is ok, and sorry if I can't understand the meaning of your speeches, it's only my fault. I tell you that if you need my help, an ocean won't limit Our friendship. Hi my friend. Carlo.
|
|
| Top |
|
|
|
618F1
|
Post subject: Re: Misc head repairs etc Posted: Sun Dec 01, 2024 1:08 pm |
|
Joined: Thu Oct 14, 2010 11:23 am
Posts: 1927
|
|
Sorry I distressed you for a while Carlo.
Cranky: Well, I try for a .006" interference fit, and hope that the plus or minus that I actually get is good enough. Sometimes I can tell differences by how easy or how hard it was to install the seats, or the guides. I will always be limited by the measuring tools I have (your lathe and related tools are impressive), and by the lack of experience. Like so many things (what kind of oil, or chain lube, or tires to use, or how far to lap the roof shingles over the gutters), you can find a wide difference of opinions out there. So you go with what you can get done that seems to be reasonable.
I do heat the heads to at least 250 degrees, and chill the seats and guides in the freezer. It is amazing how quickly (seems instantly) the small parts get hot once they touch the heated heads! I do oil the parts, and then start with a gentle tap using a plastic mallet to center them, as I do with bearings and oil seals. I am trying to avoid cocking them at all. Then I get serious using aluminum seal drivers cut to seat opening size, and a decent-sized steel mallet, all placed on a hardwood cutting board so there is no bounce when I whack it! I have never achieved a single-whack seating, like I saw some German guy do in an automotive plant somewhere. I can tell they are done when everything "rings" with a last hit. I have learned that the small bevel on the bottom of new seats is critical; the only time I have failed was when I tried to install a new Ducati steel seat that had a sharp edge on it --- ruined the seat, but not the bore. Now I chamfer/fillet them all.
I have found that Kibblewhite makes seats in some very convenient for Ducati sizes - 38-39, 40, 42, and 46mm; and I can work on them (throat opening and diameter) ahead of time on the lathe. And the guides are good to; the modern era are shorter than the 1980s versions.
In the past I used my vintage KO Lee valve seat grinder kit on the "steel" seats, a Newey tools on the "bronze" seats. Tried the Neway on the Ducati steel seats recently and that worked fine. But the grinder is much quicker on the steel. Use the 7.98 and/or 8.00 mm pilots, and 30/45 combo and 70 degree cutters. There is little [no] room in the combustion chambers to use a 15 degree cutter, and it would be hard to use a 75 degree on the shallow ports of stock Pantah heads. May go for a 31/46 degree combo cutter in the future (did in December) --- another variance of opinions.
Anyway, that is my method to date.
MikeV
PS: This posting has been corrected and edited since the original post.
Last edited by 618F1 on Sun Dec 15, 2024 1:31 pm, edited 5 times in total.
|
|
| Top |
|
|
|
583
|
Post subject: Re: Misc head repairs etc Posted: Mon Dec 02, 2024 10:14 am |
|
Joined: Wed Aug 27, 2014 3:36 pm
Posts: 373
|
|
Hi MikeV
Great job on your heads
I would like to have your skills
Filippo
|
|
| Top |
|
|
|
CrankyRoller
|
Post subject: Re: Misc head repairs etc Posted: Mon Dec 02, 2024 10:40 pm |
|
Joined: Tue Oct 05, 2010 9:21 am
Posts: 302
Images: 0
|
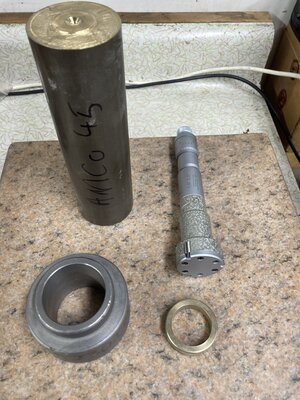
Hay Mike your press fit on the seats is about perfect and yes that lead in radius is critical.. 4 thou and they might come loose and 7ish risks cracking a head. Measurement is critical and shallow hole gauge like in pic works great and not that expensive. The steel bushing I use to calibrate the gauge. I find it easier to make the new seat out of bar stock and finish the OD for that 6 thou. I used to have access to liquid nitrogen at work and could just drop them in with heating the head to 300F. Made a screaming noise like boiling a live lobster  . Now I'm not sure but will try dry ice or the freeze cans and maybe the big hammer like you. -Cranky-
| Attachments: |
IMG_7179.JPEG [ 794.34 KiB | Viewed 18634 times ]
|
|
|
| Top |
|
|
|
Carlo
|
Post subject: Re: Misc head repairs etc Posted: Tue Dec 03, 2024 2:17 pm |
|
Joined: Thu Oct 28, 2010 4:44 am
Posts: 1873
Images: 7
|
Hi Cranky, in Italy there are general grinding workshops, I use a workshop that has been doing this type of work for many years, mainly on cars, but they also do work on motorcycle parts. I was telling you this because when I need valve guides of any shape or size, I find many automotive spare parts that can be assembled to our liking by making small changes to a valve seat already built. For example, the valve guides that go on the Hypermotard 1100 two valves, it seems to me that the guides are the same as a Ford. I'm talking about very beautiful and resistant bronze. But I think you will also know this thing. it was just to talk. I watch and learn. Ciao! 
|
|
| Top |
|
|
|
|
Page 1 of 1
|
[ 10 posts ] |
|
Who is online |
Users browsing this forum: No registered users and 1 guest |
|
You cannot post new topics in this forum
You cannot reply to topics in this forum
You cannot edit your posts in this forum
You cannot delete your posts in this forum
You cannot post attachments in this forum
|
|
|